Sunday, February 28, 2010

Felt doughnut

When I saw this tutorial for a terrific felt doughnut, I decided to take a brief intermission from my felt vegetable garden to give the doughnut a whirl. I more or less followed these instructions, other than making my frosting a little drippier.


Unfortunately, the only machine stitching is around the circumference of the doughnut, and the recommended “whip stitch” for the inside doughnut seam and frosting attachment is still a mystery to me. I even watched several videos online, but somehow watching someone else whip stitch a curtain hem just didn’t translate when it came to stitching a round, stuffed doughnut. The little tabs around the middle of the doughnut really added to the difficulty for me, as I couldn’t fold them in, hold them, and stitch them at the same time. I even tried pinning a few tabs at a time, but it just didn’t work. I was obviously just missing something, so I fudged the hand-stitching a bit.

I thought the bugle beads made cute sprinkles, but they were a lot of work! It took me several sittings to finish the beading, and at some point Taylor found the stuffed, unfrosted doughnut and decided it was her bracelet. She also found the felt carrot and ran around the house with it under her arm, stopping occasionally to take a big pretend bite, accompanied by her trademark “hup!” I’m not sure how to really spell the noise she makes when fake eating, but it is adorable.

I’m so glad Taylor is enjoying the felt food, and she gives me the motivation to keep on stitchin’!

Friday, February 26, 2010

Felt carrot

About a month ago, we took Taylor to a children’s museum in Manchester, NH, called Kaleidoscope, which features many different exhibits to encourage imaginative play. Taylor loved climbing and tumbling in the gym area, playing with the instruments in the Jammin’ Tree House, and driving the fire truck. One of her favorite activities was planting and harvesting vegetables in the little fake garden. Here she is harvesting some carrots:


Watching her determination as she plucked every last vegetable from the ground and her delight with the overflowing basket that resulted, I was inspired. I could make a play garden, couldn’t I? The garden at Kaleidoscope was designed for durability and use by many, many children—the “ground” is just a wooden platform with holes for the vegetables, and the felt vegetables appeared to be hastily made with easy hand-stitching.

Since my planned garden is intended for use only by my own two daughters and any visiting friends (and since it has to fit in our playroom), it can be much smaller. I’d really like to make the vegetables look realistic, which will be some work, but not too much, since I’ll probably only have three or four different rows of three vegetables each. For the ground, I plan to use sections of dirt-colored felt with stuffing underneath (think several long, skinny pillows side-by-side) to create the look of garden rows. Then I’ll make little openings with pouches on the underside where the vegetables can be planted. But I’m getting ahead of myself.

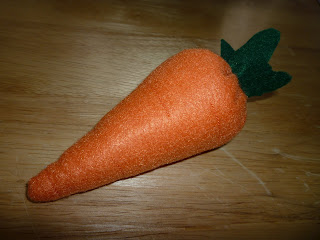
I thought I should experiment to see if I can actually sew decent-looking vegetables. I started with a carrot, because I thought it would be easier than a round vegetable. I found several examples online (just search for “felt carrot” on Flickr—it’s amazing how many people are into felt food!), but the carrots were all long and thin, and I want shorter, fatter carrots because the base of the garden won’t be very far off the ground. Many people are also fiercely protective of their felt food secrets, so I couldn’t even find a free pattern online. I’m too cheap to pay for one, so I cut my own experimental pattern out of newspaper, estimating the size I'd need and trying to imagine how it would look sewn. I cut the felt and got started, and luckily, it worked out the first time!


The top of the carrot was a little trickier than I expected, and I had to hand-stitch the carrot opening and the leaves. I’m really happy with the results—not bad for my first felt food! Taylor loves her play kitchen, so I have some other non-vegetable felt foods planned as well…I feel an obsession coming on…

Wednesday, February 24, 2010

T-shirt tote bag

I just finished my first "real" project, another t-shirt tote bag. This pattern uses two t-shirts, but actually you could use any fabric, because the sleeves and neck hole are not integral to the shape of the bag, and are in fact completely unused. I liked the idea of recycling old t-shirts into something useful, though I wish I had some unwanted graphic tees around, because a picture would certainly have added some character to the bag. All things considered, I'm happy with the finished product, and it was a good practice piece for me.


I really like the contrasting colors that create two different sides to the bag. I also got to try out my zig-zag stitch, which gives the handles a little extra something.


I shouldn't have included a close-up picture of the zig-zags, because now you can see how not straight my straight stitching is. Oh well. I definitely made some other beginner mistakes on this project, but that was to be expected. I actually had two unwanted t-shirts that I used for this project, but if I use this pattern again, I think I'll just buy fabric instead, because the bag came out a lot smaller than I expected (obviously, the bigger the shirt, the bigger the bag). But this will be a perfect size for carrying library books or smaller grocery items. The handles look short, but they are supposed to stretch with use.

If you are interested in making this bag, here are the instructions I used. I love the pink and black example bag with all the weird hairstyles on it--a cool graphic can really make this bag unique! I wish I could have used my Golden Girls t- shirt for this bag instead, but the t-shirt was way too small.

If you're just starting out sewing like I am, this makes a great beginner project, and it has lots of potential for individuality.

Tuesday, February 23, 2010

It's here! It's here!

I knew my sewing machine was due to arrive yesterday, and just as my sweet, sick Taylor drifted off into napland, I saw the UPS truck coming up the street. Taylor had been dragging around a bit since throwing up in the morning, and I didn't want the doorbell to disturb her. So I opened the door and waited on the breezeway for the UPS man to deliver the package. Note to the UPS man: If you see a pregnant woman waiting to receive an extremely heavy package, you might want to say something like, "Be careful, miss--this box is quite heavy," or even better, "Let me put this down inside the door for you." Thrusting it into the pregnant woman's arms with barely a nod is not the way to go. Just sayin'. (Don informed me later that I am a weakling and the box wasn't even heavy, but he only lifted up the actual sewing machine, without the package, packing materials, and shipping box. I just checked the product details on Amazon, and the shipping weight was allegedly only 18 pounds. But the box was gigantic, and I have small arms, AND I'm pregnant, so really, you have to add at least 30 pounds when you account for all that. But I digress.)

So here's my brand new sewing machine, which is apparently endorsed by Martha Stewart. I'm not a huge fan, but you have to admit she's a crafty lady, so if this machine works for her, it will surely work for me! Also in the picture is a Singer Sewing Essentials Kit I found at Wal-Mart for $20. I figured it was worth it just for all the thread it comes with, since individual spools of thread can be very expensive.


And here she is, out of the box--my virgin Singer 1507!


The instruction manual wasn't as daunting as I expected it to be, and I read all the relevant information before getting started. Taylor took a nice long nap, giving me enough time to unbox the machine, set it up, read the manual, wind and insert a bobbin, thread the top thread, get 'er going, and finish my first project!


I had a sweet Golden Girls t-shirt that was never again going to fit my post-pregnancy body, but I just couldn't part with it. I decided to make it into a tote bag so I could still get some use out of it. This tote bag only required one long, straight line of stitching to close the bottom of the t-shirt, which is why it was my first project. As you can probably tell from the picture, the only other steps are cutting off the sleeves and cutting the neckline to make the bag opening wider. I traced a dinner plate for the neck hole, and I cut the sleeves as close as possible to the existing seam, for a little added strength. It's not too pretty up close, so you could also cut off the seams all together. I read two different sets of instructions for this project online, and one said to hem the neck and sleeve openings for sturdier handles, and the other said this was unnecessary because jersey is very strong and stretchy. After stitching the bottom of the bag, I turned it right-side out and filled it with jars of peanut butter (I had several from a sale, of course) and gave it a few good shakes. The handles didn't break, so I decided not to hem them (although the sleeve seams probably helped). I couldn't really hem the neck hole anyway, because it would mean losing the top of the Golden Girls graphic, which was a little too high up on the original t-shirt. And the #1 rule of sewing is "Never stitch through Betty White's coiffure." Well, maybe that's not #1, but it's right up there.

My "Stay Golden" tote bag wasn't much of a challenge, but I do have a more difficult t-shirt tote bag all pinned up and ready to sew today or tomorrow. It uses two t-shirts, so it will be stronger, and it also won't look so obviously cut from a t-shirt. Stay tuned...

Thursday, February 18, 2010

A new leaf?

Against all odds, my mother and I actually finished painting the letters for Taylor's new Backyardigans bedroom! Is it possible that I have turned a new crafting leaf?


There's still a lot of work to do in the room before she can move in, but at least we've taken one step in the right direction. I can't wait to see her face when she walks into a Backyardigans bedroom just for her, and these colorful letters give me some hope that we can pull it all together.

On the sewing front, I finally ordered my sewing machine after hemming (pun intended) and hawing over the decision. I went with the Singer 1507, which I paid for mostly with Amazon gift cards I earned from Swag Bucks. If you are interested in earning gift cards and prizes through the Swag Bucks search-and-win site, check out my other blog for details. It's totally free and easy to get started; I have tried many different earning websites, and this is by far the best one.

Now that it has been ordered, I can't wait for my sewing machine to show up on my doorstep!

Tuesday, February 16, 2010

Hurdles to jump

I realize that besides my questionable history with craft projects, there are a number of obstacles I'll have to overcome if I'm actually going to learn to sew and keep on sewing.

First of all, I don't really have a place in my house where I can set up a sewing area, which could seriously affect my day-to-day motivation. If I could leave my sewing machine set up on a table and have my current projects available and ready to be sewn, I'm sure I would be much more likely to work on them when I have time. But if I have to drag everything out and set it all up every time I want to sew a few seams, I wonder how often I'll actually do it. I haven't yet discussed this with my husband, Don, but I know exactly what he'll say: "We'll put it in the office!" That is his answer anytime I say, "But we have nowhere to put that!" Our 16' x 5' office already houses three large desks, a computer, two printers, a bookcase, four guitar cases, and lots of assorted junk, with barely enough room to access the storage room and bulkhead on either end of the skinny basement room. Don has finally admitted that our 5-drawer filing cabinet just won't fit.

Space issues aside, I also have a very active toddler. Taylor is 19 months old and, of course, gets into everything. She still takes a nice long afternoon nap, which is probably when I would have to do a lot of my sewing. I suppose this new hobby will end up being just one more distraction from my housework, which, I must admit, makes me want to start sewing immediately...mwa ha ha.

I also have a baby girl due at the beginning of June. My goal is to really get familiar with my new sewing machine and complete some basic projects before the baby arrives. I'm sure that sewing, along with the rest of life, will be put on hold for a while once I'm juggling an infant and a toddler. But if I can get back into the swing of things, it would be nice to already know what I'm doing so that my little bits of free time can be used for actual sewing, instead of manual-reading and pattern-interpreting.

I have been trying to get a few small projects cut and pinned so that when my sewing machine arrives, I'll hopefully be motivated to actually sew them together. My hope is that finishing some easy projects will keep me interested, and maybe I'll take a stab at something more challenging. We shall see...

In other crafting news, my mother (who is staying with us while Don is out of town) and I finally tackled the painting of the wooden letters for Taylor's bedroom wall. My mom bought the letters when Taylor was first born, and we never painted them or hung them in the nursery, so now we're painting them to match her new Backyardigans bedroom. We painted the first coat during Taylor's nap today, with the intention of doing the second coat after we got her to bed. But we're both too tired, so we'll just do it tomorrow. Really, we will! I guess "procraftination" runs in the family.

Monday, February 15, 2010

Can a crafting failure learn to sew?

A few weeks ago, I developed the intense desire to learn how to sew. I'm not exactly sure why, but it could have something to do with the fact that I am five months pregnant with my second daughter. I have heard about women who pick up random, short-lived hobbies during their pregnancies, and maybe this is mine. I hope not, because I really do want to learn to sew proficiently. I decided to start this blog to chronicle my adventures in sewing--perhaps not the most riveting of topics, but maybe some of you will be inspired to learn along with me. Or perhaps, if I stick with it and post about my projects, you might see a pattern you'd like to try yourself. Or maybe, as my husband suggested, I will lose interest in a matter of weeks and change the title of my blog to "Sew Long!"

I wish I could say his prediction is off-target, but I have a terrible track record when it comes to craft projects of all kinds. I visited the graveyard of unfinished craft projects in my closet, and I found these:


In the picture are a piece of a knitted scarf (running out of yarn was clearly not my problem), a half-finished cross-stitch pattern, a partially painted wooden train that was supposed to be for my 4-year-old cousin Ian (sorry, Ian), and 16 wooden blocks in a wooden box. I had big plans to make those blocks into a six-sided puzzle by decoupaging pictures from children's books or old calendars. I really think I would have done it, but after purchasing the blocks, I realized that they were not perfect cubes, which meant that the puzzle wouldn't be smooth on all sides. But really, I would have done it. I swear.

Elsewhere in my home, if I looked in the right places, I know I would find many more partially completed cross-stitch projects, a poorly-stained chalkboard/bulletin board combo, and a half-woven fringed baby blanket intended for my cousin Bradley, who is now 18 years old. I also have several empty scrapbooks and a drawer full of various scrapbooking notions. I'm good at planning craft projects, but my execution leaves much to be desired.

In truth, this is not my first attempt at sewing. I did take sewing lessons when I was about 12 years old, and I made a denim drawstring bag and a few pieces of clothing. I have a particularly frightening memory of a backyard fashion show for the students to display their work, in which I modeled a sweet pair of culottes. That's right. Culottes. To illustrate just how long it has been since I've undertaken a sewing project, check out the goodies I found in my old sewing box:


What was I thinking when I bought fabric markers and giant buttons in three alarmingly fluorescent colors? And what is with the freaky troll doll head cut out of stretchy fabric? I fear that my plan was for some sort of neon button-covered mess of a t-shirt, and for once, I am relieved that one of my projects bit the dust.

So I used a sewing machine in class 15 years ago, and I have very occasionally used my mother's machine for quick fixes, but I still consider myself a beginner. I found a few throw pillow patterns that I wanted to try, and they looked easy enough, but then I read the instructions. Bias-cut edges? Interfacing? FLANGE??? What have I gotten myself into?