Showing posts with label felt food. Show all posts

Wednesday, March 24, 2010

Felt radish

I’ve determined that the third row of vegetables in Taylor’s felt garden will be radishes! I don’t think she has ever seen a real radish, but she has seen drawings of radishes in her Peter Rabbit book. When I gave her the felt radish, she took a big fake bite with her usual “hup!” So apparently she knows it’s food.


The toughest part of making the radish was getting the bottom to look pointy. It came out more like a little nub, but I think I know how to fix it next time. It’s hard to tell in the picture, but the leafy top is actually three separate floppy leaves, and Taylor likes to tickle my nose with them!

Now that I’m rolling on the vegetables, I need to start brainstorming ideas for the garden itself!

Sunday, March 14, 2010

Felt potato

So I thought that round (or roundish) vegetables would be the toughest to make out of felt, but it turns out that might not be true! The potato was so easy to make that I made two!


I studied a few pictures online of other crafters’ felt potatoes, and I noticed that many of them used only two panels to form the potato. The nice thing about that is you only see two seams, but I thought four panels would help give the potato the roundness that I wanted and the seams would hopefully not be too distracting. I think it was the right call; the potatoes look nice and full. I added the “eyes” after stuffing the potato so that I could tie a knot and then pull the thread through the inside of the potato to make a little pucker at each eye, creating the lumpy look of a real potato.

I’m so happy with how the potatoes turned out that I’m mentally planning some apples, oranges, tomatoes, pears, and other round fruits and vegetables. So far, I have two carrots and two potatoes for my felt garden. I’ll make one or two more of each of those, but I haven’t decided which other vegetables to “plant” in the garden. I can’t think of very many recognizable root vegetables; I’m pretty sure Taylor would not know a turnip or a radish if she saw one. But I suppose that’s how she’ll learn, right?

I had some free time to shop alone today, thanks to my wonderful husband, so I went out in search of the perfect baskets for my garden. I think I found them at Building 19, though I wish the store had two in the smaller size.


I settled for one of each size for now, but I may be checking out another Building 19 next weekend in hopes of finding another small one. It’s nice that these two nest together for storage purposes, but the smaller one is the perfect size for little hands, and two the same size would prevent any fighting over the bigger, better basket. Since the baskets say “Country Market,” I guess I might have to construct some kind of a farm stand as well. Hmmm…I’ll have to mull that one over.

Friday, March 5, 2010

Felt corncob with removable husks

In the play garden at Kaleidoscope, there were several cornstalks with felt corncobs attached magnetically. I thought a cornstalk or two would be a cute addition to my felt garden, but after attempting my first corncob, I can say with confidence that there will be no cornstalks.

My corncob project was delayed two separate times when I ran out of yellow thread and then green felt. It was also very time-consuming to stitch the kernels and the lines on the husks. I was working without a pattern again, so I had to make it work as I went. The bottoms of the cob and husk were especially challenging, and I just did the best I could to make them semi-presentable.

I finally finished it today, so here it is, my felt corncob with removable husks!


This will be my one and only corncob, and I’ll be sure to choose a simpler vegetable to attempt next, because this one was a big pain!

Sunday, February 28, 2010

Felt doughnut

When I saw this tutorial for a terrific felt doughnut, I decided to take a brief intermission from my felt vegetable garden to give the doughnut a whirl. I more or less followed these instructions, other than making my frosting a little drippier.


Unfortunately, the only machine stitching is around the circumference of the doughnut, and the recommended “whip stitch” for the inside doughnut seam and frosting attachment is still a mystery to me. I even watched several videos online, but somehow watching someone else whip stitch a curtain hem just didn’t translate when it came to stitching a round, stuffed doughnut. The little tabs around the middle of the doughnut really added to the difficulty for me, as I couldn’t fold them in, hold them, and stitch them at the same time. I even tried pinning a few tabs at a time, but it just didn’t work. I was obviously just missing something, so I fudged the hand-stitching a bit.

I thought the bugle beads made cute sprinkles, but they were a lot of work! It took me several sittings to finish the beading, and at some point Taylor found the stuffed, unfrosted doughnut and decided it was her bracelet. She also found the felt carrot and ran around the house with it under her arm, stopping occasionally to take a big pretend bite, accompanied by her trademark “hup!” I’m not sure how to really spell the noise she makes when fake eating, but it is adorable.

I’m so glad Taylor is enjoying the felt food, and she gives me the motivation to keep on stitchin’!

Friday, February 26, 2010

Felt carrot

About a month ago, we took Taylor to a children’s museum in Manchester, NH, called Kaleidoscope, which features many different exhibits to encourage imaginative play. Taylor loved climbing and tumbling in the gym area, playing with the instruments in the Jammin’ Tree House, and driving the fire truck. One of her favorite activities was planting and harvesting vegetables in the little fake garden. Here she is harvesting some carrots:


Watching her determination as she plucked every last vegetable from the ground and her delight with the overflowing basket that resulted, I was inspired. I could make a play garden, couldn’t I? The garden at Kaleidoscope was designed for durability and use by many, many children—the “ground” is just a wooden platform with holes for the vegetables, and the felt vegetables appeared to be hastily made with easy hand-stitching.

Since my planned garden is intended for use only by my own two daughters and any visiting friends (and since it has to fit in our playroom), it can be much smaller. I’d really like to make the vegetables look realistic, which will be some work, but not too much, since I’ll probably only have three or four different rows of three vegetables each. For the ground, I plan to use sections of dirt-colored felt with stuffing underneath (think several long, skinny pillows side-by-side) to create the look of garden rows. Then I’ll make little openings with pouches on the underside where the vegetables can be planted. But I’m getting ahead of myself.

I thought I should experiment to see if I can actually sew decent-looking vegetables. I started with a carrot, because I thought it would be easier than a round vegetable. I found several examples online (just search for “felt carrot” on Flickr—it’s amazing how many people are into felt food!), but the carrots were all long and thin, and I want shorter, fatter carrots because the base of the garden won’t be very far off the ground. Many people are also fiercely protective of their felt food secrets, so I couldn’t even find a free pattern online. I’m too cheap to pay for one, so I cut my own experimental pattern out of newspaper, estimating the size I'd need and trying to imagine how it would look sewn. I cut the felt and got started, and luckily, it worked out the first time!


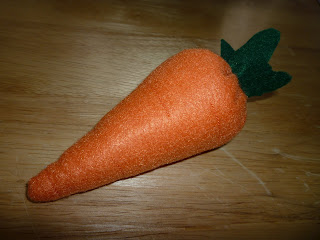
The top of the carrot was a little trickier than I expected, and I had to hand-stitch the carrot opening and the leaves. I’m really happy with the results—not bad for my first felt food! Taylor loves her play kitchen, so I have some other non-vegetable felt foods planned as well…I feel an obsession coming on…